Did you move to Office 365 account and want to access Zimbra briefcases on the same? Wondering how to save Zimbra briefcase items to Office 365? Searching for a trouble-free and cost-effective method to implement the required migration? If yes, then not to worry because here we have provided an approach that will help to directly save Zimbra briefcase items in Office 365 with other mailboxes as well.
Detailed Overview of Zimbra
Zimbra is widely used collaborative computer application that manages user’s emails, calendars, contacts, documents, etc. It is a web-based application package that can be accessed as on-premises private cloud or as external public cloud service. It is especially for enterprise deployment with the primary goal to integrate a host of collaboration tools.
It supports variety of email protocols, including SMTP, POP, IMAP, and ActiveSync, and can be accessed from a web browser, desktop client, or mobile app.
Zimbra’s collaboration features include shared calendars, contacts, and files, as well as group messaging and video conferencing. It also includes security features such as anti-spam and anti-virus protection, as well as data backup and recovery. Moreover, it is widely used by small and medium-sized businesses, educational institutions, and government agencies. It is an open-source version that is free to use and modify under the terms of the GNU i.e. General Public License.
What is Zimbra Briefcase and How to create it in Zimbra Account?
Zimbra briefcase is one of the most used feature of ZCS that help users to store, share, and collaborate on files and documents. The files stored in Zimbra are accessible through web browser, desktop client, or mobile app, and delivers a secure as well as flexible way to manage files and collaborate with others.
Steps to Create Zimbra Briefcase in Zimbra Profile
1. Login to Zimbra and go to Briefcase tab.
2. Click New button to create new folder in the briefcase.
3. Specify the folder name and choose the sharing options for the folder. You can choose to share the folder with specific individuals, groups, or make it publicly accessible.
4. Click the Create button to create a folder.
5. And, now to add files to the briefcase, simply drag-and-drop files from the computer into the folder. You can also upload files with the help of Upload button.
6. Choose the required files to share and click Share button.
7. If you want to collaborate on files, then choose the required files to collaborate and click Collaborate button.
Note. Zimbra briefcase is a powerful function that can help in managing and collaborating on important files that can be customized to meet the requirements of an organization or team.
How to Save Zimbra Briefcase Items in Office 365?
With the help of CubexSoft Zimbra to Office 365 Migration Tool, users can save unlimited Zimbra briefcase folders to Office 365 at once. The tool is user-friendly, cost-effective, and secure. Any technical and novice users can manage the application effortlessly and save Zimbra briefcase items in Office 365 without dealing with any errors. The application steps are also non-typical and capable of handling large migration in minimum time.
Working Steps to Save Zimbra Briefcase items in Office 365
Step 1. Download, and run CubexSoft Zimbra to Office 365 Tool on Windows and select the first option.

Step 2. Navigate to Add File(s) button appearing on the top-left of the menu bar.

Step 3. Choose the required option and add necessary TGZ files/folder/extracted TGZ items.

Step 4. The tool will scan the selected files of Zimbra and then show them in hierarchical structure with checkboxes on the software.

Step 5. You can choose the Zimbra briefcase folder and view the data of its files in a Preview window before starting with Export process.

Step 6. Click Export button appearing on the menu bar and click Select Saving Options to choose Office 365 option.

Step 7. Specify Office 365 username. You can click I am Admin if you are having administrator account of Office 365.
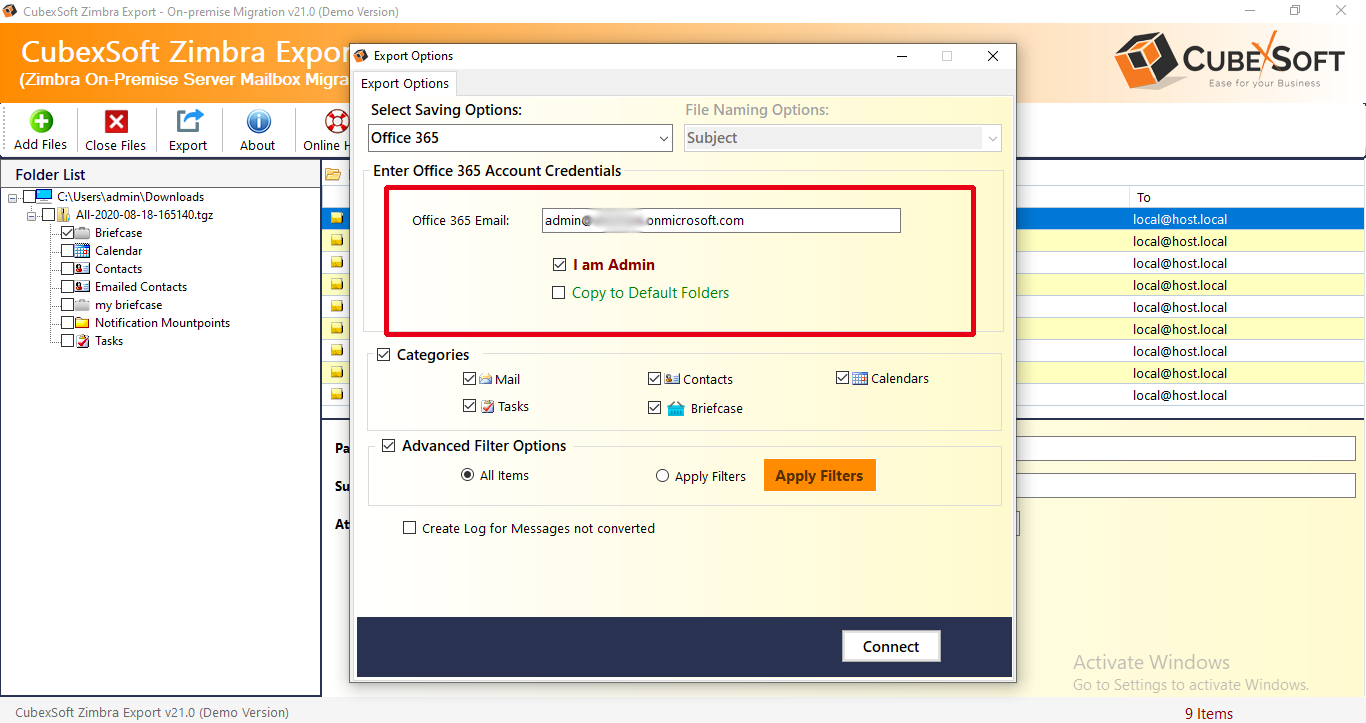
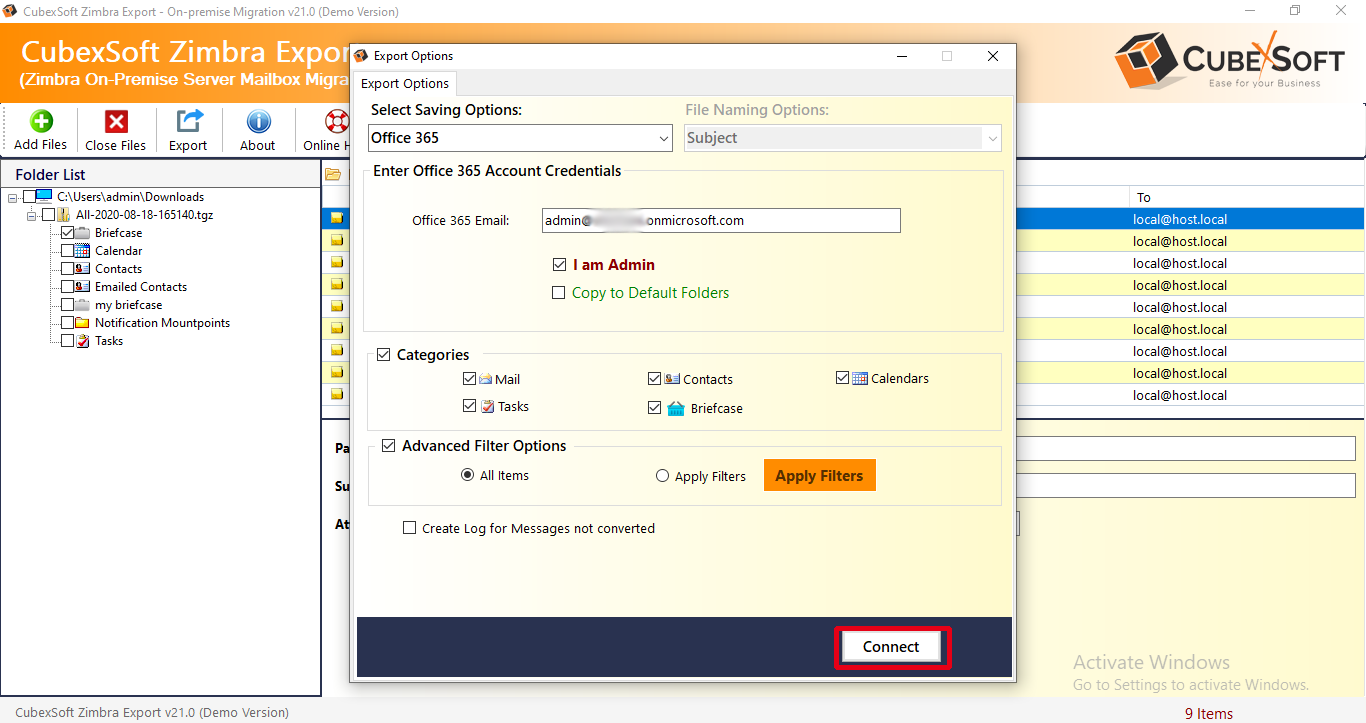
Step 8. Set the other options like categories/filters as per requirements and click Connect.
Step 9. The tool will show Microsoft login screen in which you need to provide the password of specified Office 365 account. Click Next.
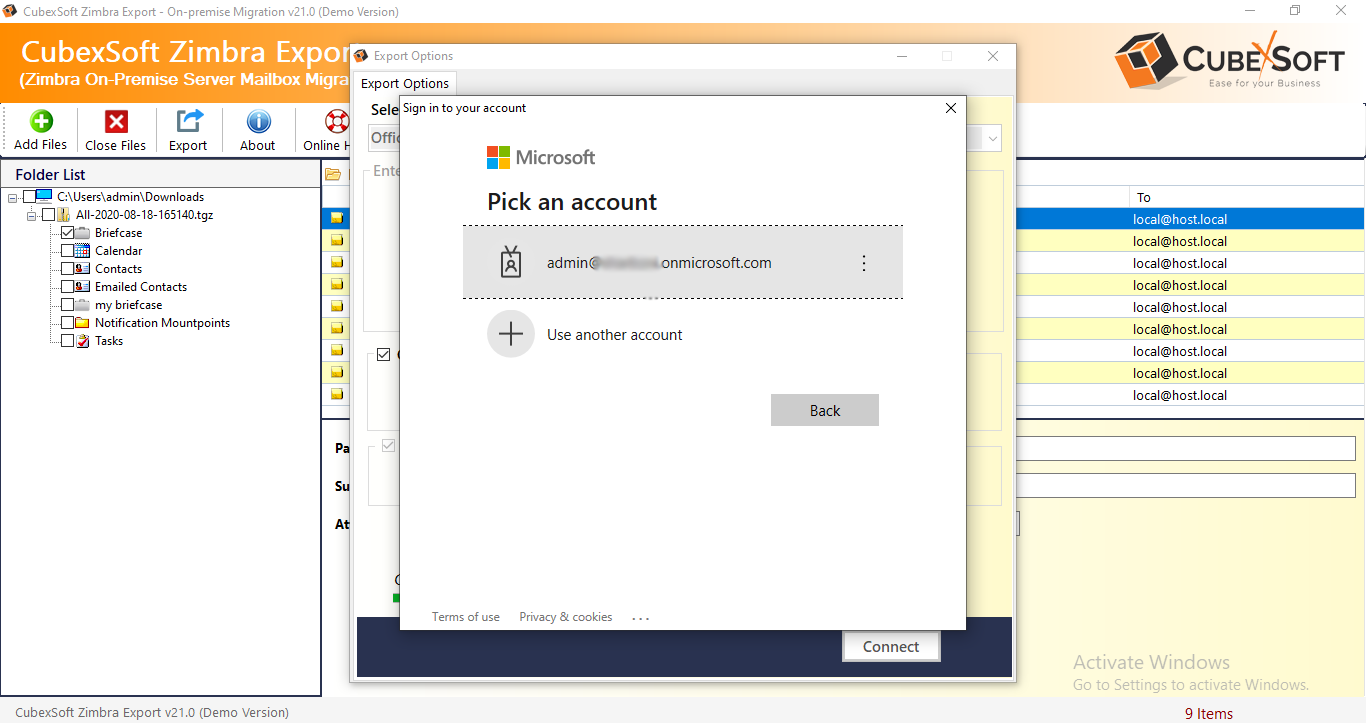
Quick Note. If you have specified single user detail of Office 365, then the tool will straightaway start the migration. But, if admin details are added, then the app will show mailbox mapping window where you want to upload a CSV with multiple Office 365 users.
Step 10. The process will start and completes by displaying Process Completed Successfully message on the screen. Tap on OK button and go to Office 365 profile to check the results.
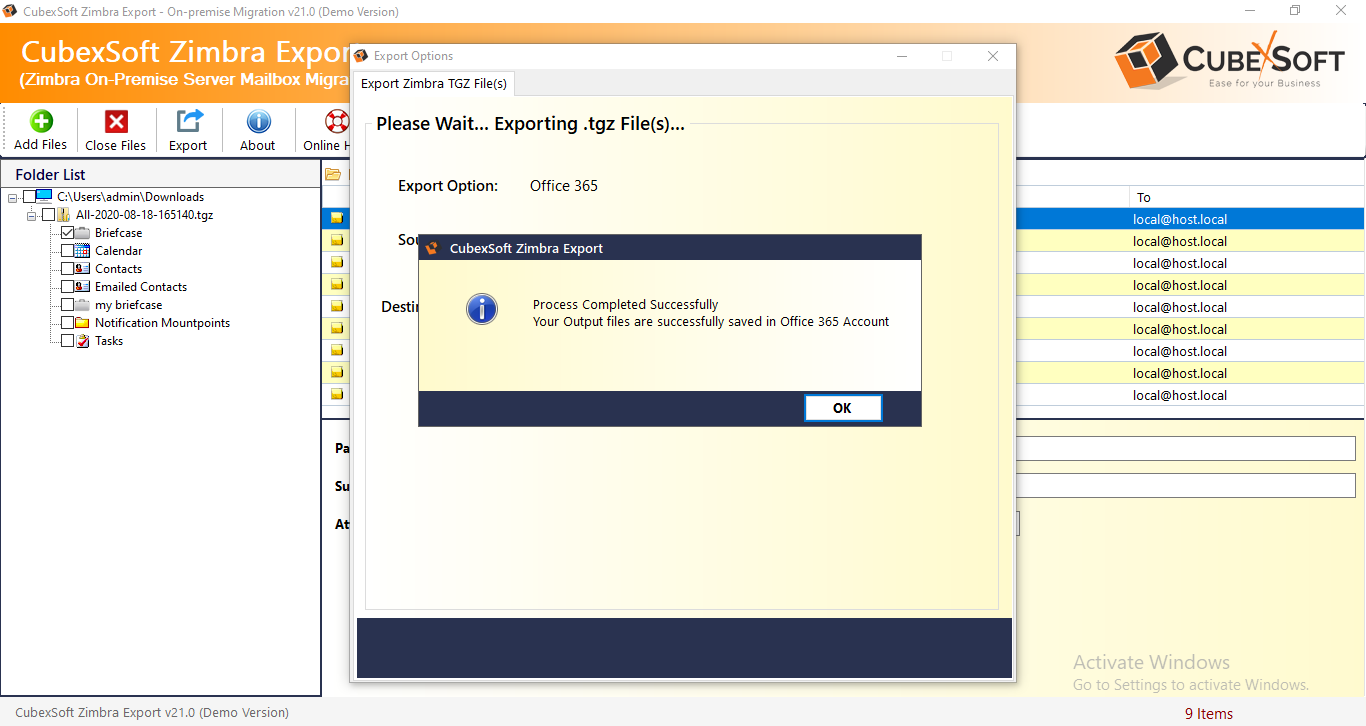
However, you will see that the transferred data is completely accurate and appearing with exact content properties.
Conclusion
The entire blog has provided a direct solution to save Zimbra briefcase items to Office 365 in a bulk at once. The CubexSoft Zimbra Converter not only migrate Zimbra briefcases but also helps to save Zimbra briefcase with emails, calendars, tasks, contacts, etc. However, the application has a free demo as well which will help them to explore the complete software working for free. They can even save first 25 files from Zimbra folders to Office 365 free of cost.
How to Save Zimbra Briefcase Items in Office 365?
Did you move to Office 365 account and want to access Zimbra briefcases on the same? Wondering how to save Zimbra briefcase items to Office 365? Searching for a trouble-free and cost-effective method to implement the required migration? If yes, then not to worry because here we have provided an approach that will help to directly save Zimbra briefcase items in Office 365 with other mailboxes as well.
Detailed Overview of Zimbra
Zimbra is widely used collaborative computer application that manages user’s emails, calendars, contacts, documents, etc. It is a web-based application package that can be accessed as on-premises private cloud or as external public cloud service. It is especially for enterprise deployment with the primary goal to integrate a host of collaboration tools.
It supports variety of email protocols, including SMTP, POP, IMAP, and ActiveSync, and can be accessed from a web browser, desktop client, or mobile app.
Zimbra’s collaboration features include shared calendars, contacts, and files, as well as group messaging and video conferencing. It also includes security features such as anti-spam and anti-virus protection, as well as data backup and recovery. Moreover, it is widely used by small and medium-sized businesses, educational institutions, and government agencies. It is an open-source version that is free to use and modify under the terms of the GNU i.e. General Public License.
What is Zimbra Briefcase and How to create it in Zimbra Account?
Zimbra briefcase is one of the most used feature of ZCS that help users to store, share, and collaborate on files and documents. The files stored in Zimbra are accessible through web browser, desktop client, or mobile app, and delivers a secure as well as flexible way to manage files and collaborate with others.
Steps to Create Zimbra Briefcase in Zimbra Profile
1. Login to Zimbra and go to Briefcase tab.
2. Click New button to create new folder in the briefcase.
3. Specify the folder name and choose the sharing options for the folder. You can choose to share the folder with specific individuals, groups, or make it publicly accessible.
4. Click the Create button to create a folder.
5. And, now to add files to the briefcase, simply drag-and-drop files from the computer into the folder. You can also upload files with the help of Upload button.
6. Choose the required files to share and click Share button.
7. If you want to collaborate on files, then choose the required files to collaborate and click Collaborate button.
Note. Zimbra briefcase is a powerful function that can help in managing and collaborating on important files that can be customized to meet the requirements of an organization or team.
How to Save Zimbra Briefcase Items in Office 365?
With the help of CubexSoft Zimbra to Office 365 Migration Tool, users can save unlimited Zimbra briefcase folders to Office 365 at once. The tool is user-friendly, cost-effective, and secure. Any technical and novice users can manage the application effortlessly and save Zimbra briefcase items in Office 365 without dealing with any errors. The application steps are also non-typical and capable of handling large migration in minimum time.
Working Steps to Save Zimbra Briefcase items in Office 365
Step 1. Download, and run CubexSoft Zimbra to Office 365 Tool on Windows and select the first option.
Step 2. Navigate to Add File(s) button appearing on the top-left of the menu bar.
Step 3. Choose the required option and add necessary TGZ files/folder/extracted TGZ items.
Step 4. The tool will scan the selected files of Zimbra and then show them in hierarchical structure with checkboxes on the software.
Step 5. You can choose the Zimbra briefcase folder and view the data of its files in a Preview window before starting with Export process.
Step 6. Click Export button appearing on the menu bar and click Select Saving Options to choose Office 365 option.
Step 7. Specify Office 365 username. You can click I am Admin if you are having administrator account of Office 365.
Step 8. Set the other options like categories/filters as per requirements and click Connect.
Step 9. The tool will show Microsoft login screen in which you need to provide the password of specified Office 365 account. Click Next.
Quick Note. If you have specified single user detail of Office 365, then the tool will straightaway start the migration. But, if admin details are added, then the app will show mailbox mapping window where you want to upload a CSV with multiple Office 365 users.
Step 10. The process will start and completes by displaying Process Completed Successfully message on the screen. Tap on OK button and go to Office 365 profile to check the results.
However, you will see that the transferred data is completely accurate and appearing with exact content properties.
Conclusion
The entire blog has provided a direct solution to save Zimbra briefcase items to Office 365 in a bulk at once. The CubexSoft Zimbra Converter not only migrate Zimbra briefcases but also helps to save Zimbra briefcase with emails, calendars, tasks, contacts, etc. However, the application has a free demo as well which will help them to explore the complete software working for free. They can even save first 25 files from Zimbra folders to Office 365 free of cost.
Related Articles